Audio Basics for Hams, Part 4 – Signal Routing
While it’s perfectly fine to read each article a la carte, if you haven’t had a chance to look at the previous articles about audio basics, it would probably behoove you to go take a gander at them when you have a chance. 🙂 I’m explaining concepts all the way from the sound you make in the air with your mouth, through the audio mixer, and finally into your radio, so some of the earlier articles will be helpful for you to understand as the ideas progress. If you haven’t been to them thus far, here are the links for your reading pleasure:
Audio Basics for Hams, Part 1!
Audio Basics for Hams, Part 2 – All About the Pattern
Audio Basics for Hams, Part 3 – Signal Chain
So now that you’re all caught up, let’s talk about something that’s relatively mundane- signal path and routing. Aack. Who wants to hear about that? Well, probably nobody, but like taking your fish oil pills, it’s something you’ll need to do if you intend on staying healthy. Well, maybe not exactly…
We’ve made it through preamps so far and know that they take our mic level signal and amplify it up to line level for use with other audio gear. We could plug our preamp directly into the line level input on our radio and go at it, but where’s the fun in that? What if you wanted to plug your computer’s audio output into the same line level input jack on your radio so you could play on some digital modes every once in a while? You’d be back there plugging and unplugging constantly, unless you got a mixer. We’ve all seen pictures of pretty looking audio mixers with bunches of knobs and switches, and most people are intimidated by them upon first sight. But in reality, a mixer will probably be one of your most used pieces of gear if you decide to go that route. Each mixer has its own sets of capabilities, but in general, a mixer allows you to take multiple audio inputs, adjust the gain (strength) of each one, and route them to outputs of your choice. How signals get from here to there is called routing, and what happens to the signal on the way is called processing. I’m not going to get into specific processing descriptions in this article- that’ll be fine for another time.
In its simplest form, a mixer consists of at least one summing bus and often multiple gain stages. A bus is a circuit where multiple signals are summed (or mixed) together so that they can be output on one line. We would have a problem if we took all of our line level inputs and just added them all together because we could overload the bus and get a nasty loud mess coming out. In order to prevent that, there are usually many places where the gain of each channel can be adjusted both before and after summing them together. Can you guess the first gain stage on a mixer? Yeah, you remembered! The preamp is the first gain stage since it’s the first amplifier where the incoming signal can be boosted (made stronger) or attenuated (made weaker).
Before we move on, it would probably be good to talk about the typical setup of your average, run-of-the-mill audio mixer. Normally they’re arranged so that signal flow is visualized from the top to the bottom, and in vertical channel strips that are tall and narrow. Each channel strip corresponds to an input, and all of the knobs and faders in that strip only affect the signal on that channel. So in other words, every strip is a duplicate of all of the other ones, and if you know what the stuff in that strip does, you have most of the board figured out already. Usually the very top potentiometer in a strip controls the gain of the preamp. Following the channel strip down, the next set of knobs is often the equalizer (that adjusts the tonality of the incoming signal- more about that in the future), and depending on the board, Aux Sends may follow that (more on those later too). There will typically be a pan knob near the the channel’s “On” button which is above its fader. Often there are routing buttons for sending that channel’s signal to the proper buses for summing somewhere in there too. Here’s a simple diagram:
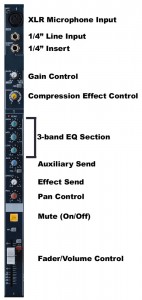
Source: http://www.world-of-songwriting.com/mixing-songs.html
On simple stereo mixers there are a minimum of two buses- one for the left channel and one for the right. The pan knob lets you choose which one (or which mix of both) you send that channel’s signal down. If it stays in the middle, the same signal level goes down both buses. The fader is at the bottom of the channel strip and is essentially a more refined version of the gain knob. Guess what that means? That means that the fader is the second gain stage since it can amplify the signal as well as attenuate it! So far, our signal has traveled through two amplifiers on its way out. One other thing: faders almost always have a logarithmic taper. That just means that the fader will make a larger adjustment to the signal at the bottom than it does at the top. In other words, 1/2″ of travel at the bottom might adjust the signal by 20dB, whereas 1/2″ at the top will only adjust it by 3dB. The amount of adjustment gets finer as you move up the fader.
Once the audio signal is safely onto the main stereo bus it has been mixed with other incoming signals and needs to get out somehow. Depending on the way you’ve panned or otherwise routed it, the main bus goes through the main fader (some mixers might have a Left and Right main fader) where the overall mix level can be controlled before the signal exits the mixers output jacks. In this setup, that’s the third, and final gain stage.
So why all of the emphasis on gain stages? Well, as hams we know that electronic circuits all have idiosyncrasies that affect their performance. Amplifiers (audio or otherwise) are no different, so there are places where those amps function the best. In the audio world, the “sweet spot” of an amp is called nominal. For audio gain stages, nominal is typically marked with a “0” (that’s a zero!) and are usually located somewhere between half and two-thirds up the scale. It’s like this for both the preamp pot at the top of the channel and the fader at the bottom. The idea is that getting your gain structure setup properly is very important if you want the audio to be as good as it can be. Gain structure is essentially trying to get each of the gain stages set as close to nominal as possible so that each amplifier is performing in its own sweet spot. In other words, you don’t want your gain knob turned up so high that the signal it ouputs forces the fader to stay near the bottom, or so low that the fader needs to be at the very top to get enough signal to the main fader. Ideally, your channel fader should live near nominal if possible and your gain knob should be set as close to nominal as you can get it while maintaining the fader position. This all takes a good bit of practice to become skilled at it, but those are the general ideas anyway.
So now you have a pretty good idea about what the various parts of audio mixers are and how a signal makes its way through one. There’s still a bunch more to add to this topic, so we’ll come back to it again next week. Like always, feel free to leave comments at the bottom or post topics in our forum. Chances are that other people have the same questions as you!










Got something to say?
You must be logged in to post a comment.